
Our homes need love and care, just as we do. Over time, homes fall into disrepair and need to be updated and cleaned deeply. Styles change, dirt accumulates, colors fade and our homes grow older like us.
I write in CLEAR: How to Simplify Your Life & Live More Fearlessly, that our environment is a reflection of our inner selves. It is important to give consideration to how we want to live and what our surroundings are like. We can support success in our lives when our homes are well cared for and a reflection of our personal style.
Through my coaching, I work with people holistically on health, fitness, mindset, and their environment. All the elements that support true success.
One key point that we work on is aligning my clients’ environment to who they are. My background as a designer and creative comes in handy here. I am able to work on some pretty cool projects and in some fabulous homes. It is incredibly rewarding for both me and my clients to see their homes transform to reflect who they truly are and compliment the changes they are experiencing through coaching.
Sometimes, I get to work on fun projects like this!
The Project
I had clients who bought a house in upstate New York. They were a NYC couple transitioning their lives to work and live full time upstate with the option of going into the city as needed. For years they admired a house from afar, and when it came onto the market, they snatched it up immediately. They went through the process of renovating it to become the home of their dreams and place of retirement, which is only a handful of years away. Like any renovation project, they discovered all sorts of issues and dilemmas that crept up room by room.
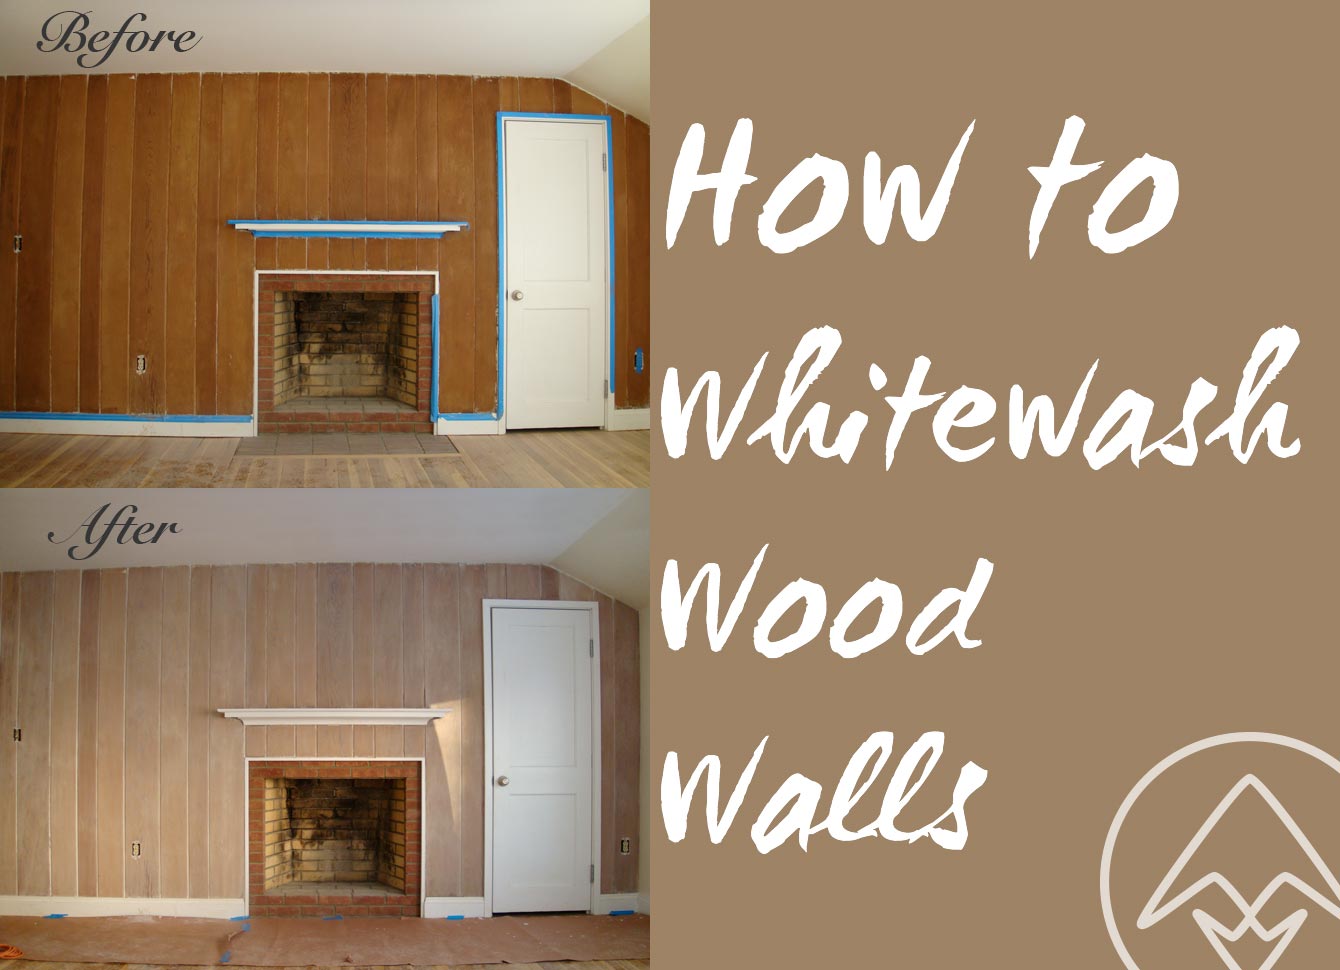
This room, pictured above, is technically the third bedroom. They decided to use it as their media room. While the rest of the room has sheet rock walls, this one wall with the fireplace is paneled in pine boards.
Previous to the ‘Before’ photo being taken, the pine wall was covered in hideous layers of old cracking paint. After going over various options for the wall, my clients and I decided to whitewash it to soften the overall feel of the room.
We had the wall striped with an eco friendly paint remover and then sanded down to 220 grit with palm sanders. From there, I rolled my sleeves up and got started on the Whitewash Project, which is sometimes called pickling. Please note that this is technically NOT whitewashing. Traditionally, whitewashing is a process that involves mixing water, lime, and various materials to make a thin paintable plaster. However, there is no technical phrase for the process pictured above. It is generally referred to as Whitewashing. (Confusing, I know!)
Below, are the materials and steps involved.
Materials:
Drop cloth
Chisel (optional)
Screwdriver
220 sandpaper
Vacuum cleaner
Paintbrush
Rags
Water
Paint
Container
Steel wool (optional)
How to Whitewash a Wall With Paint:
Step 1- Prepare the area for painting by laying down a drop cloth or paper to protect the floors. If the trim and baseboard need to be protected, use blue tape to cover them. Also, make sure to remove outlet covers and light fixtures from walls.
Step 2- Since someone else removed the old paint and sanded the wall, I went over the wall to inspect it and remove any paint that was left over in the crevices of the panels or along the mantle and trim. I used a chisel to gently scrape some of the paint off. But in most cases, this step will not be needed. The cleaner your wall is to begin with, the cleaner the outcome will be. Whitewashing allows the grain of the wood to be highlighted. So, any imperfections will also be highlighted!
Step 3- Go over the wall and quickly hand sand it with 220 grit sandpaper to make sure the surface is smooth and the flecks of old paint are gone. Vacuum the wall with the brush attachment and then take a dry rag and wipe the wall down. It is amazing how much wood dust sticks to everything.
Step 4- Mix your whitewash solution in a container using clean water and interior paint. In this project, I used Benjamin Moore’s Aura Paint in Acadia, as the rest of the room is painted this color and we wanted a lighter version of the other walls. Most interior paints and colored wood stains, in flat to satin finish, will work for this application. I used a ratio of 25% paint and 75% water. Always start with more water and play around with the ratios until you are happy with the results. Remember to continually stir the solution throughout the project to keep it evenly mixed and prevent the paint from settling to the bottom .
Step 5- Working in small areas, apply the solution to the wall with a paintbrush. As you paint the solution on, have a rag ready to rub the wall and pick up the excess paint. Beware of splinters when you rub the walls! As you move across the wall, you will notice that the solution does not look even due to the wood absorbing the paint. Don’t fret! Let the wall dry completely and inspect the results, as it will most likely dry evenly. In the photo above, I did one coat of the whitewash solution. I am happy with the amount of wood grain showing through. As you add more coats of whitewash, the wood wall will become more opaque and show less wood grain.
Step 6- (Optional) Go over the wall with steel wool to make the raised grain smooth.
Good luck with your project! Let me know how it comes out and tag your photos on social media with #clearbook and #annickhowto. I would love to feature your work.
If you liked this post, please share and sign up for my newsletter above!
A bientôt,
Annick